အမ်ိဳးအစားအလိုက္ၾကည့္႐ႈရန္

Showing posts with label Network. Show all posts

Tuesday, March 3, 2015

How to Print to a Shared Mac OS X Printer from Windows 7 & Windows 8

There are a number of indirect ways that you can trick Windows 7 and Windows 8 into printing from a shared printer attached to a Mac, but the best way to do it is through Bonjour. That’s because with every version change - either between Windows or OS X - the process gets muddled and a new solution has to be devised. But Bonjour has been fairly reliable even as both operating systems have evolved. In this tutorial, you’ll learn how to set up OS X so that its shared printers are available to Windows computers and devices.
NOTE: This guide has been updated for Mac OS X Mountain Lion (version 10.8).

How to Enable Print Sharing in Mac OS X

In Mac OS X, first open System Preferences. In the Internet & Wireless section, look for the Sharing button. Click on it.
How to Print to a Shared Mac OS X Printer from Windows 7 & Windows 8
The Sharing window opens. Enable the checkbox near Printer Sharing. OS X then lists the printers installed on your Mac.
How to Print to a Shared Mac OS X Printer from Windows 7 & Windows 8
You can go ahead and share them from here. Check the box near the printer you want to share. Then, in the Users section, configure the sharing permissions. Select the users you allow to print and the permissions level assigned.
When done, close the Sharing window, and the System Preferences window.

How to Share a Printer Connected to a Mac OS X

Even though enabling printer sharing provides the options required to share a printer, there’s another way to share printers. First, printer sharing needs to be turned on.
Open System Preferences. In the Hardware section, look for the Print & Scan button and click on it.
How to Print to a Shared Mac OS X Printer from Windows 7 & Windows 8
The Print & Scan window opens. Here, you see the printers installed on your Mac. Select the printer you want to share. Then, check the box that says "Share this printer on the network".
How to Print to a Shared Mac OS X Printer from Windows 7 & Windows 8
If you want to customize how the printer is shared, click the Sharing Preferences button.

How to Add a Mac OS X Shared Printer to Windows 7 or Windows 8

Download Bonjour Print Services for Windows from the Apple Support website. As of this writing, the current version is Bonjour 2.0.2, which supports Windows XP Service Pack 2 or later. It also works in Windows 8. Installation is straightforward: run the setup file, agree to the terms (read them, if you’d like) and keep clicking Next until it’s finished.
Now, run the "Bonjour Printer Wizard". Make sure your Mac is up and running, connected to the network and the printer is connected and turned on. If all is well, Bonjour will automatically detect the shared printers. They’ll be listed as "PRINTER NAME @ COMPUTER NAME". Choose the printer you’d like to install and click Next.
How to Print to a Shared Mac OS X Printer from Windows 7 & Windows 8
If prompted, install the printer drivers. If you have the printer drivers installed on your computer already, you can choose them from the list. If not, you’ll have to locate them manually by clicking Have Disk. Make sure that you install the proper drivers for your specific printer model, otherwise you may have limited or no printer function.
How to Print to a Shared Mac OS X Printer from Windows 7 & Windows 8
After choosing the drivers, you’ll have an opportunity to verify the settings before finishing the printer setup. Click Finish if all looks good.
How to Print to a Shared Mac OS X Printer from Windows 7 & Windows 8
Now, the OS X shared printer will be available in the Devices and Printers panel of Windows. You can print to your Mac OS X shared printer as you would on a local printer, from the Print dialogue of the program you are using.


Monday, December 15, 2014

How to Change the Priority of Wired/Wireless Network Cards in Windows

Network ၾကိဳးေရာ wireless ပါအသံုးျပဳၿပီး အင္တာနက္ႏွစ္လိုင္းကို တစ္ျပိဳင္တည္းအသံုးျပဳေနၿပီဆိုလွ်င္ ဘယ္လိုင္းကို ဦးစားေပးအသံုးျပဳေနလဲၾကည့္ဖို႔ရန္ႏွင့္ ေျပာင္းလဲလိုလွ်င္.......

Do you ever plug in your wired network card while your wireless card is still enabled? Ever wonder how Windows chooses which one to use? Here’s how to see the default priority—and how to change it if you want.

How to See the Current Network Card Priority

You’ll need to open up a new command prompt window and type in the following command:
netstat -rn | more
The | more part of the command will make sure that it doesn’t go flying off the screen, requiring you to scroll backwards—speaking of which, you should read our article about how to scroll backwards in the command prompt with the keyboard.
image
At the top of the output you’ll see the Interface List, and the column on the left-hand side shows the metric of the interface. You’ll notice that the loopback interface has the highest priority, followed by my wired Gigabit card, and then my wireless card.
image
If you’re wondering what all the other cards in the list are about, I’ve got some VPN software loaded, as well as VMware Workstation, all of which create virtual adapters that show up in the list.

How to Change the Network Card Priority

To change the priority, head into Network and Sharing Center and click on the Change adapter settings link on the left-hand side—or you can quickly open the network connections list by typing ncpa.cpl into the Start Menu search box.
image
Now that we’re in here, choose the network card that you want to change the priority for, right-click it, and choose Properties from the menu.
image
Now select the Internet Protocol Version 4 item in the list, and click the Properties button.
image
Now click the Advanced button at the bottom of this window…. getting tired of clicking yet?
image
And now, finally, we’re at the place where you can make the change. Uncheck the box for Automatic Metric, and then type a number into the Interface Metric textbox. You can consult the list that we found in the command prompt earlier to know what metric to assign—you’ll probably want to assign it something higher than 1, since that’s used for the loopback adapter.
image
You may want to go ahead and change the priority for your other card as well, just to be sure that it is assigned the proper priority.

Wednesday, July 10, 2013

Windows 8 Computer ကို DOS Command အသံုးျပဳ၍ Wireless Hotspot Access Point ျပဳလုပ္ျခင္း

1. Command Prompt window ကို Administrator ျဖင့္ဖြင့္ပါ။ (Win+X --> command prompt  (admin) )

Command Prompt as Admin

2. Wireless Device က Hotspot အသံုးျပဳလို႔ ရမရကိုၾကည့္ရန္ ေအာက္မွာ ျပထားသည့္ Command ကို႐ိုက္ထည့္ပါ။ အသံုးျပဳလို႔ရလွ်င္ ေအာက္ကပံုတြင္ ၀ိုင္းျပထားသည့္အတိုင္း Hosted Network supported = Yes ျဖစ္ေနမည္။
netsh wlan show drivers
3. အသံုးျပဳလို႔ရတယ္ဆိုရင္ေတာ့ ေအာက္မွျပထားတဲ့ Command ကို႐ိုက္ထည့္ၿပီး SSID, Password ကိုသက္မွတ္ေပပါ။

netsh wlan  set hostednetwork mode=allow ssid=myssid key=password
netsh wlan start hostednetwork 
(myssid ႏွင့္ password ေနရာတြင္မိမိႀကိဳက္ႏွစ္သက္ရာ ထည့္ပါ။)
netsh wlan
4.  အင္တာနက္ကို Sharing လုပ္ရန္ Internet Connection Sharing ကိုဖြင့္ပါ။

  1. Run ကိုဖြင္ရန္ Win+R ကိုႏွိပ္ပါ
  2. Wireless Adapter ကို Right Click ႏွိပ္ၿပီး Properties ေရြးပါ။
  3. Sharing Tab တြင္  “Allow other network users to connect through this computer’s Internet connection” ကို ေရြးပါ။
Network Sharing Properties

5. OK ကိုႏွိပ္ပါ။ Network Connection သည္ေအာက္မွာျပထားသည့္အတိုင္းျဖစ္ေနမည္။

Network Connection with Virtual WiFi

-------------------------------------*****--------------------------------
အေပၚမွလုပ္တဲ့အတိုင္းအဆင္မေျပရင္ေတာ့ ဒီေဆာ့၀ဲေလးကိုသံုးၿပီး Hotspot ျပဳလုပ္လို႔ရပါတယ္။
ေဒါင္းလုပ္ လုပ္ရန္။ ေအာက္မွေပးထားတဲ့ လင့္ကို ႏွိပ္ပါ။
8 free tools that easily turns your Windows system into a wireless hotspot.

Connectify on Windows 8

Original Site Link
http://www.nextofwindows.com/how-to-turn-your-windows-8-computer-into-a-wireless-hotspot-access-point/

Monday, July 1, 2013

GSM Mobile ဖုန္းျဖင့္ Dial-Up အသံုးျပဳျခင္း


တစ္ခါတစ္ေလ GSM ဖုန္းေတြမွာ Driver အဆင္မေျပလို႔ Modem Driver ေလာက္ပဲတင္လုိ႔ရတယ္၊ USB Tethering, Wireless Hotspots, အဆင္မေျပဘူးဆို ရင္ဒီနည္းေလးနဲ႔ ခ်ိတ္ဆက္လုိ႔အဆင္ေျပပါတယ္။ မ်ားေသားအားျဖင့္ေတာ့ Window XP, ေတြမွာ ေတြ႔ရမ်ားပါတယ္။ Window 7 ကေတာ့ Tethering and Portable Wi-Fi Hotspots အဆင္ေျပတာမ်ားပါတယ္။ GSM Android ဖုန္းမဟုတ္သူေတြအတြက္ လဲအဆင္ေျပပါတယ္။
Ref: http://support.verizonwireless.com/clc/devices/knowledge_base.html?id=29355
  1. Launch Network Connections.
    Note From the Windows desktop click Start > (Settings) > Control Panels > Network and Internet Connections > Network Connections.
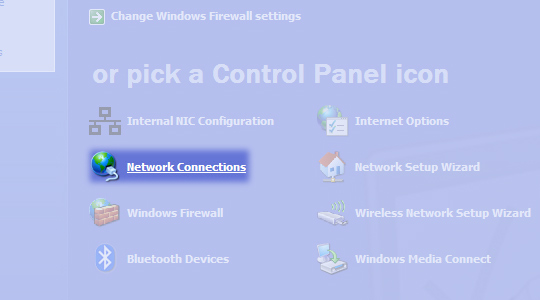
    Network Connections
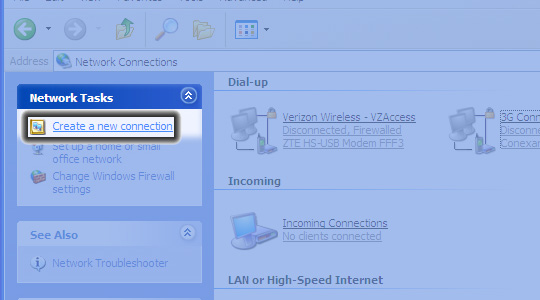
  2. From Network Tasks, click Create a new connection.
    Create a new connection
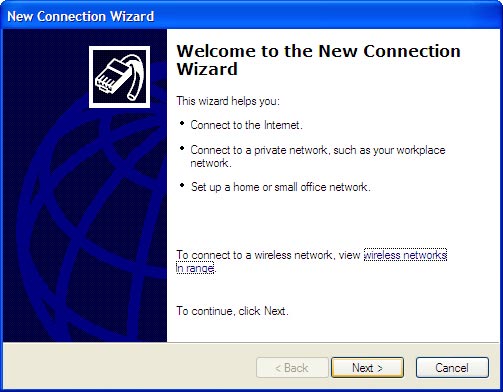
  3. Click Next.
    New Connection Wizard
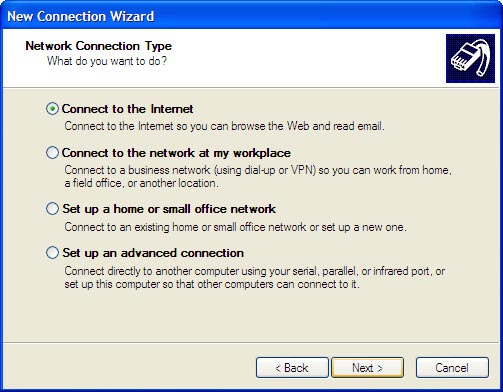
  4. Select Connect to the Internet then click Next.
    Network Connection Type
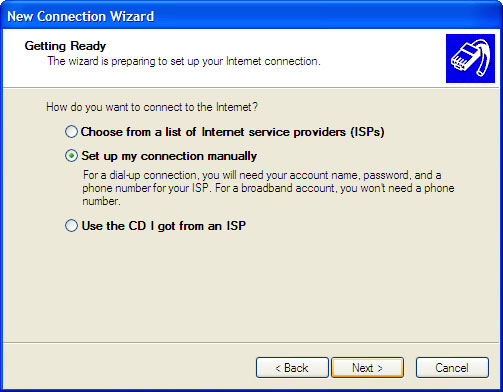
  5. Select Set up my connection manually then click Next.
    Getting Ready screen
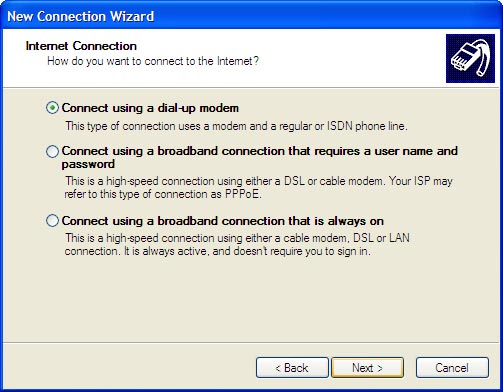
  6. Select Connect using a dial-up modem then click Next.
    Internet Connection
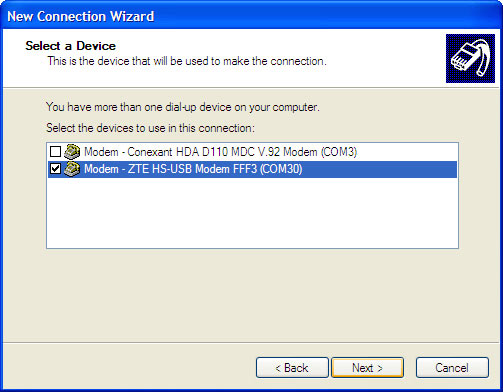
  7. Ensure the appropriate modem is selected then click Next.
    Select a Device
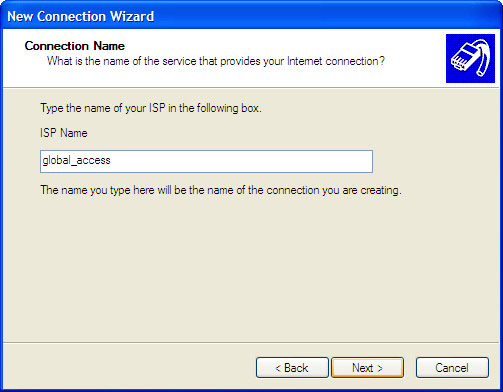
  8. Enter a unique connection name, (e.g. global_access) then click Next.
    Connection Name
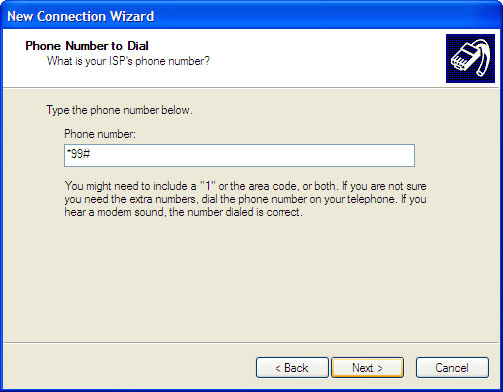
  9. Enter *99# then click Next.
    Phone Number to Dial
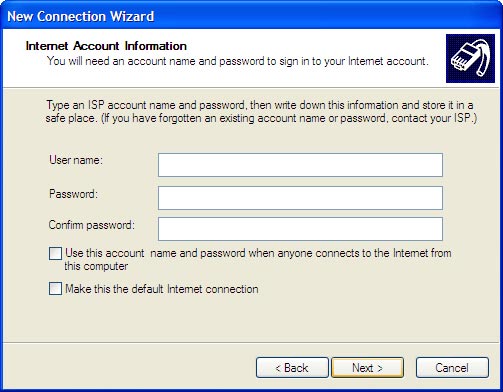
  10. User Name နဲ႔ Password ကို မထည့္ပဲ Next. ႏိုပ္ပါ။ Internet Account Information
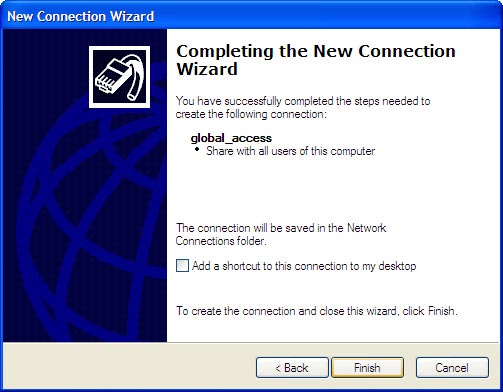
  11. If desired, ensure Add a shortcut to this connection to my desktop is selected then click Finish.
    Completing the New Connection Wizard
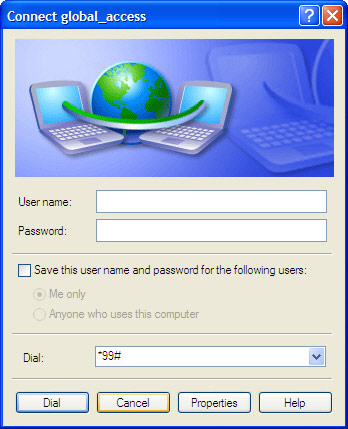
  12. Click Cancel.
    Connect screen


Configuring the APN (Access Point Name)
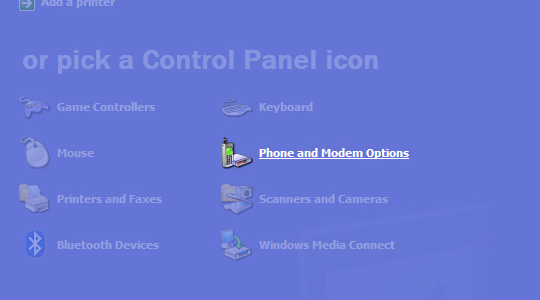
  1. Launch Phone and Modem Options.
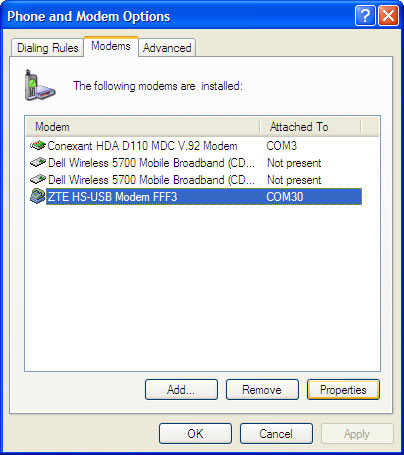
    Note From the Windows desktop click Start > (Settings) > Control Panels > Printers and Other Hardware > Phone and Modem Options.
    Phone and Modem Options
  2. From the Modems tab, ensure the appropriate modem is selected then click Properties.
    Modems tab
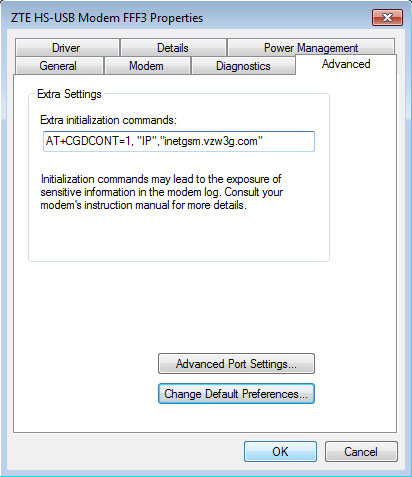
  3. From the Advanced tab, enter AT+CGDCONT=1,"IP","mptnet" then click OK.
    Note The quotation marks must be included.


Windows Vista / 7
Creating a manual DUN (Dial-Up Networking) connection
Configuring the APN (Access Point Name)


Creating a manual DUN (Dial-Up Networking) connection
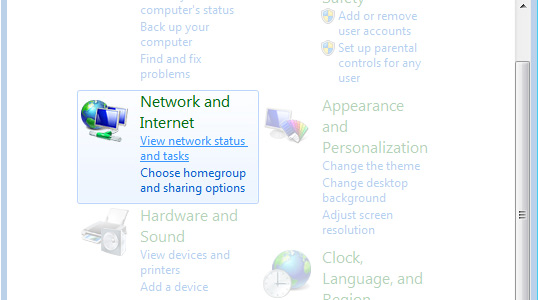
  1. Launch Network and Sharing Center.
    Note From the Windows desktop click Start > Control Panel > View network status and tasks.
    View network status and tasks
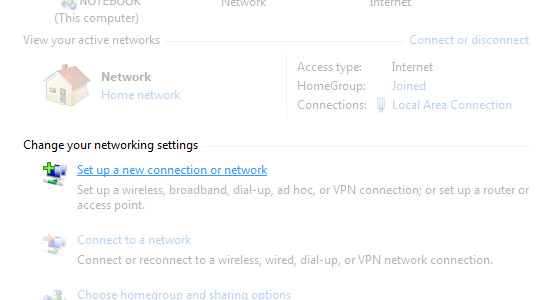
  2. Click Set up a new connection or network.
    Note In Windows Vista: From Tasks, click Set up a connection or network.
    Set up a new connection or network
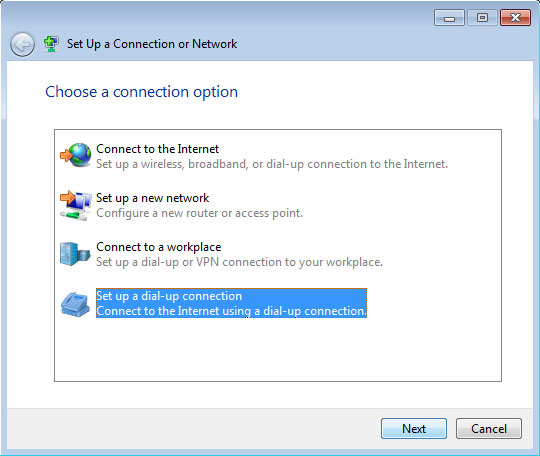
  3. Click Set up a dial-up connection.
    Set up a dial-up connection
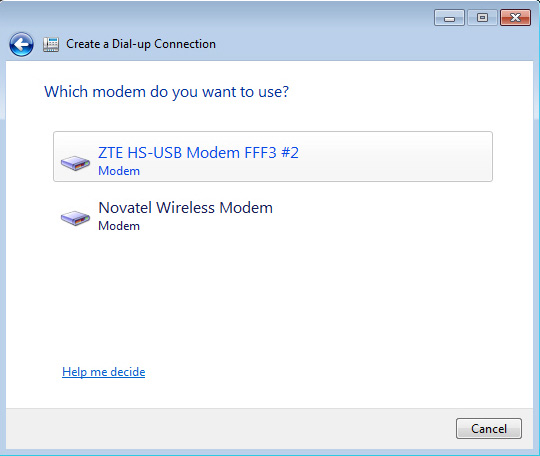
  4. If presented, click the appropriate modem.
    Which modem to use
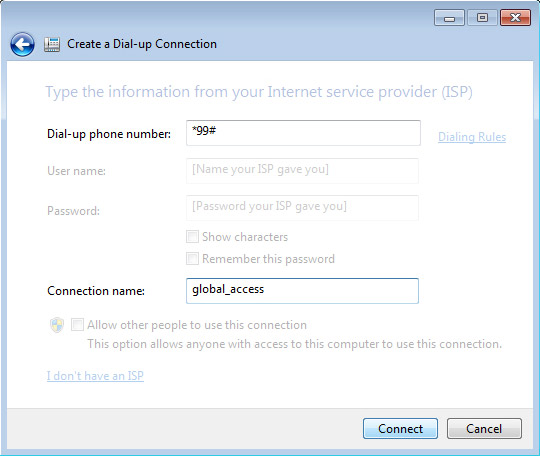
  5. From the Dial-up phone number field, enter *99#. From the Connection name field, enter a unique name (e.g. global_access) then click Connect.
    ISP information screen
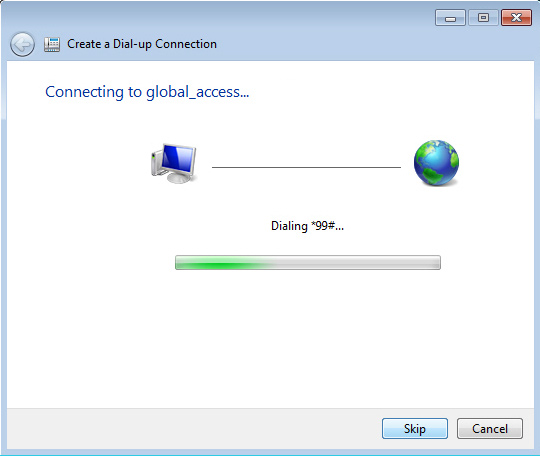
  6. Click Skip.
    Note If connection attempt fails, click Set up connection anyway.
    Connecting screen
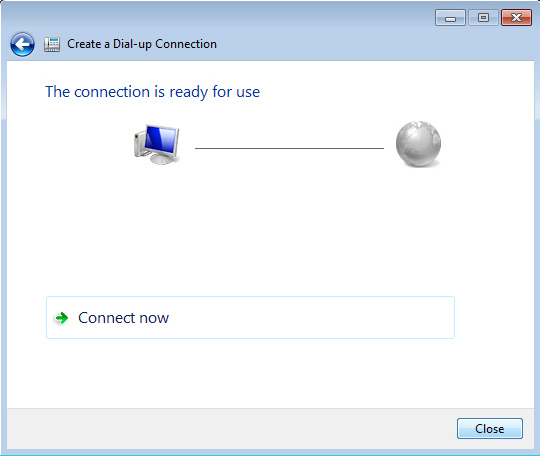
  7. Click Close.
    Connection ready to use screen

Configuring the APN (Access Point Name)
  1. Launch Phone and Modem Options.
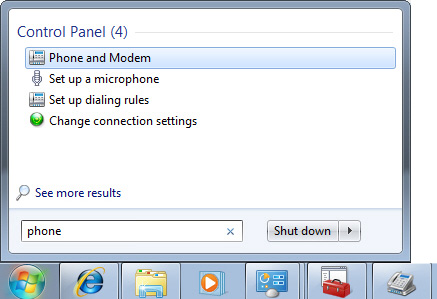
    Note From the Windows desktop click Start. From the Search programs and files field, enter phone then click Phone and Modem.
    Phone and Modem search
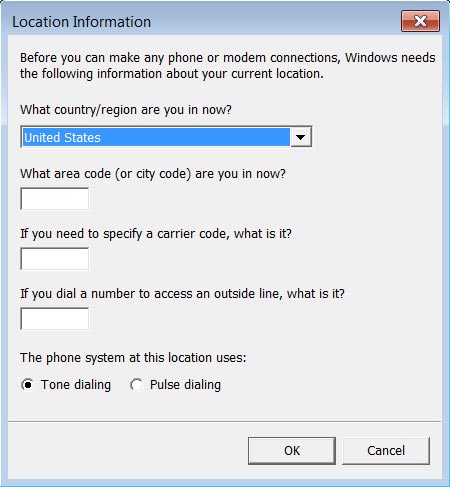
  2. If presented, enter the local area code then click OK.
    Location Information screen
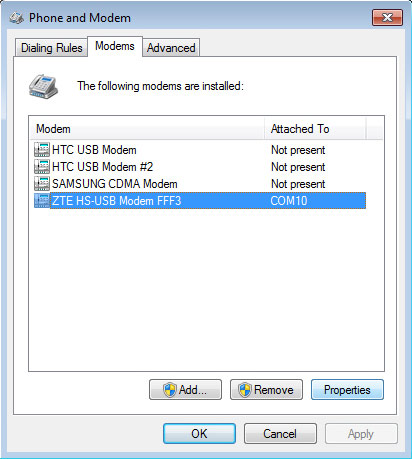
  3. From the Modem tab, select the appropriate modem then click Properties.
    Installed modems
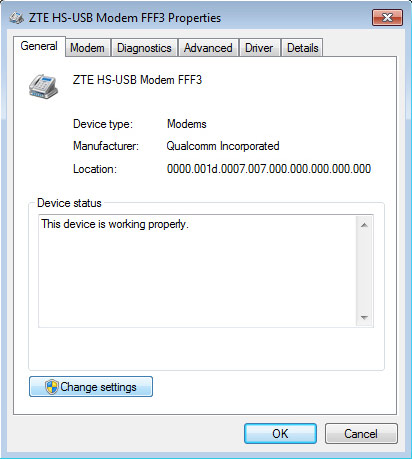
  4. Click Change settings.
    Modem properties
  5. From the Advanced tab, enter AT+CGDCONT=1,"IP","mptnet" then click OK.
    Note The quotation marks must be included.
    Advanced tab