IT Solution & Diary
ဒီ Blog ေလးကို ကၽြန္ေတာ့ရဲ႕ စက္ျပင္အေတြ႔အၾကံဳမ်ားႏွင့္ Knowledge မ်ားကို ေရးသားေဖာ္ျပပါမည္။
Sunday, September 10, 2023
Thursday, August 17, 2023
How to bypass internet connection to install Windows 11
-
Select your region setting after the installation on the first page of the out-of-the-box experience (OOBE).

-
Click the Yes button.
-
Select your keyboard layout setting.

-
Click the Yes button.
-
Click the Skip button if you do not need to configure a second layout.
-
On the “Oops, you’ve lost internet connection” or “Let’s connect you to a network” page, use the “Shift + F10” keyboard shortcut.
-
In Command Prompt, type the
OOBE\BYPASSNROcommand to bypass network requirements on Windows 11 and press Enter.
-
The computer will restart automatically, and the out-of-box experience (OOBE) will start again.
Quick note: You will need to select the region and keyboard settings again to get to the network connection page. -
Click the “I don’t have internet” option.

-
Click the “Continue with limited setup” option.

-
Click the Accept button (if applicable).
-
Confirm the name of the local default account on Windows 11.

-
Click the Next button.
-
Create a password for the account.

-
Click the Next button.
-
Confirm the account password.
-
Click the Next button.
-
Select and complete the three security questions to recover the account.

-
Click the Next button.
-
Choose the privacy settings.

-
Click the Next button.
-
Click the Next button again.
-
Click the Accept button.
Saturday, June 3, 2023
Fix: 0x80070035 Error Code The Network Path was Not Found / How to solve LAN network sharing access Unblock by Kaspersky Internet Security 100%
- In the main application window, click
 .
.
To learn how to open the main application window, see this article. - Go to Security settings and select Firewall.
- Click Packet rules.
- Select the Local Services (TCP) checkbox and click Edit.
- In the Action drop-down list, select Allow.
- Click Save.
- Click Confirm.
- Repeat steps 4–7 for Local Services (UDP).
- In the main application window, click
 .
.
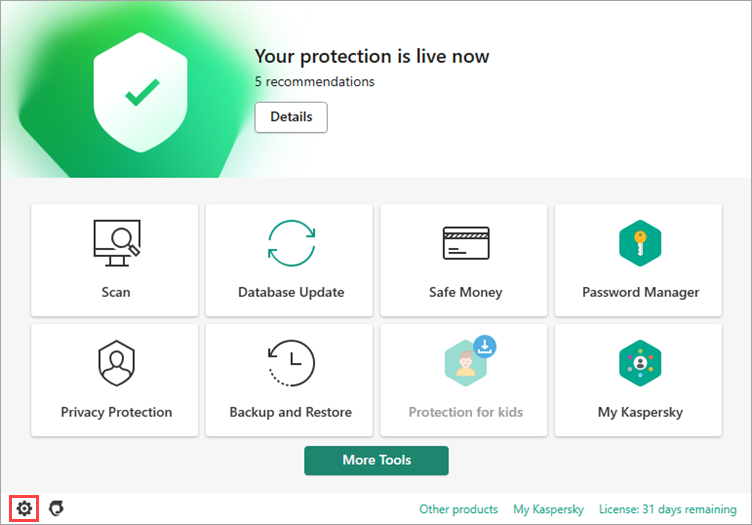
- To learn how to open the main application window, see this article.
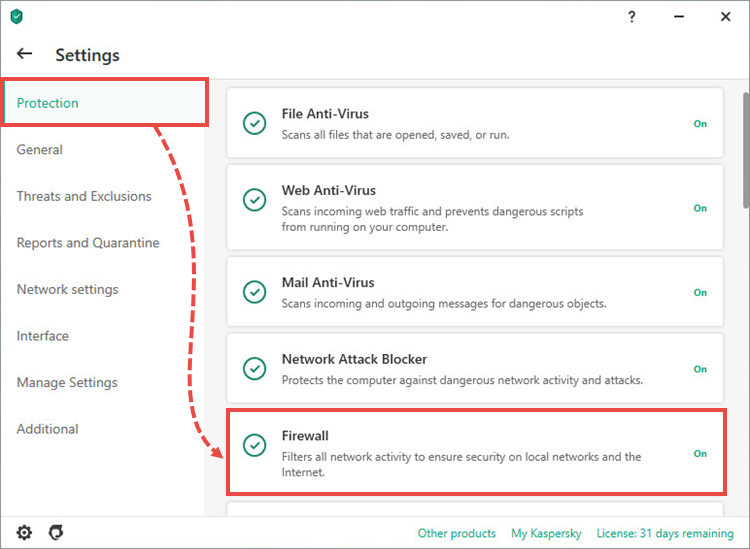
- Go to the Protection section and click Firewall.
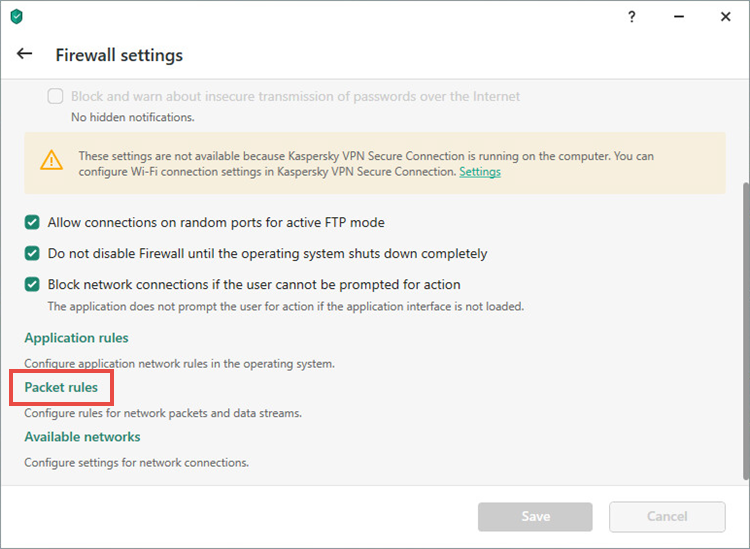
- Click Packet rules.
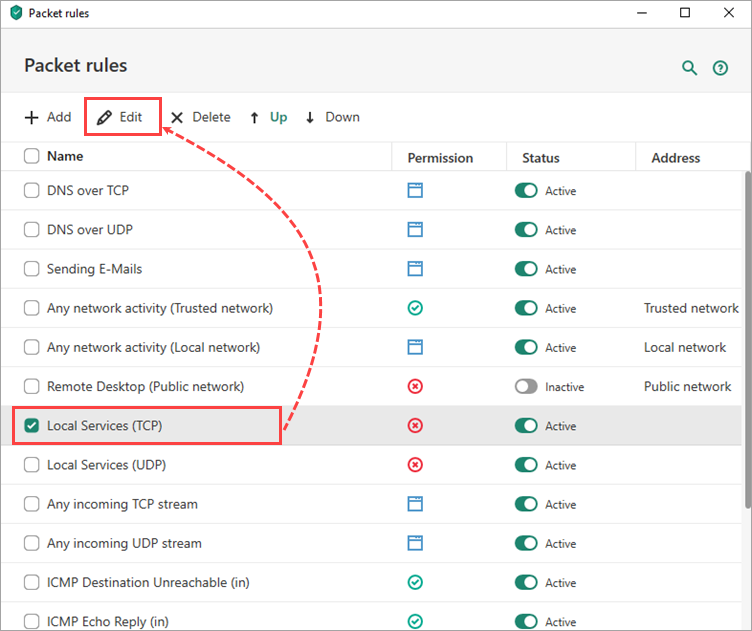
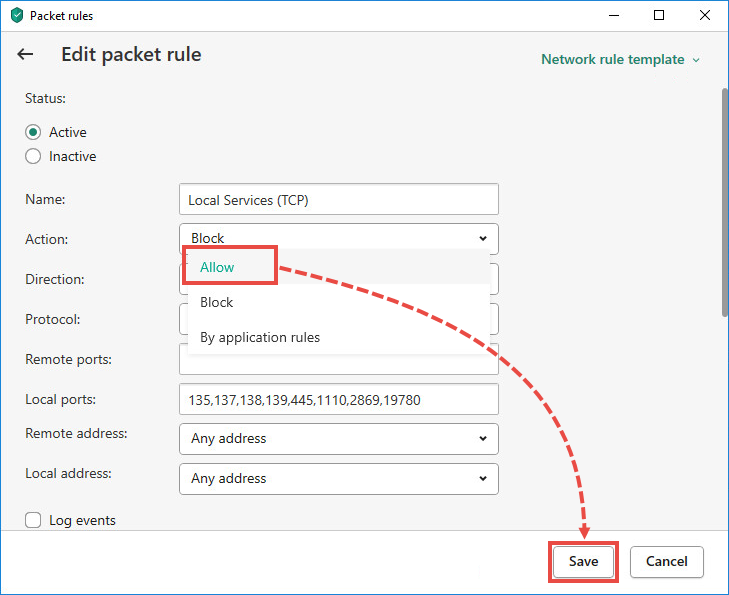
- Select the Local Services (TCP) checkbox and click Edit.
- In the Action drop-down, select Allow.
- Click Save.
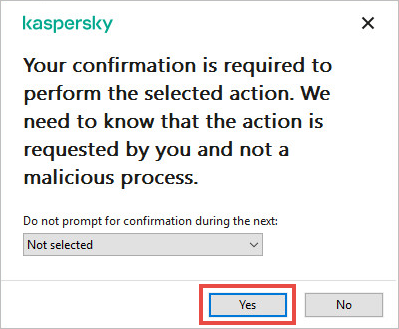
- Click Yes.
- Repeat steps 4–7 for Local Services (UDP).
Monday, November 26, 2018
Window 10 မွာ Blue Scren ေျဖရွင္းနည္း
၁) Window DVD ျဖင့္ Boot တက္ပါ။
၂) Install လုပ္ရမည့္ေနရာတြင့္ "Repair Your Computer" ကိုေရြးပါ။
၃) Troubleshoot ကိုေရြးပါ
Tuesday, January 30, 2018
Window 10 မွာ Safe Mode ကို၀င္ေရာက္ဖို႔ နည္းလမ္း (၆) ခု
Safe Mode ဆိုတာ Computer Operation System (OS) ေတြအတြက္ diagnostic mode ျဖစ္ပါတယ္။ Window error မ်ားကိုေျဖရွင္း ကူညီေျဖရွင္းရန္အတြက္ ရည္ရြယ္ပါသည္။ Safe Mode ကိုအသံုးျပဳတဲ့အခါ Operating System အတြက္ မရွိမျဖစ္ Services ေတြနဲ႔ Driver မ်ားကိုသာ အလုပ္လုပ္ေစၿပီး Minimal User Interface ျဖင့္သာ Window တက္လာပါမည္။

1. System Configuration tool (msconfig.exe) ကိုအသံုးျပဳျခင္း
Windows + R keys ကိုတစ္ၿပိဳင္နက္ထဲ ႏွိပ္ပါ၊ msconfig လို႔ Run Box မွာ ရိုက္ထည့္ပါ။ OK ႏွိပ္ပါ။ဒါမွမဟုတ္ရင္ Start Menu က Search မွာ System Configuration လို႔ရိုက္ထည့္ၿပီး System Configuration ကိုဖြင့္ပါ။


Boot tab ကိုဖြင့္ပါ။ Boot options ရဲ႕ေအာက္မွာ“Safe boot” ကိုေရြးပါ။ OK ႏွိပ္ပါ။ စက္ကို Restart လုပ္ပါ။

2. “Shift + Restart” ကိုအသံုးျပဳျခင္း
ကီးဘုတ္မွ Shift ကိုႏွိပ္ထားပါ၊ Start Menu မွ Power ကိုႏွိပ္ပါ။ Restart ကိုႏွိပ္ပါ။
Reboot ျဖစ္ၿပီျပန္တက္အလာတြင္ Troubleshoot ကိုႏွိပ္ပါ။ Troubleshoot ထဲမွ Advanced Options ကိုေရြးပါ။ Advanced Options မွ Startup Setting ကိုေရြးပါ။ Restart ကိုႏွိပ္ပါ။


Windows 10 reboots လုပ္ၿပီးတဲ့အခ်ိန္မွ Startup Settings ထဲမွ Safe Mode ကို၀င္ရန္ 4 or F4 ကိုႏွိပ္ပါ။

3. Windows Settings ကိုအသံုးျပဳျခင္း
Settings (Windows + I) ကိုဖြင့္ပါ။ Update & security ကိုဖြင့္ပါ။ ဘယ္ဘက္အျခမ္းမွာ Recovery ကိုႏွိပ္ပါ။ Advanced Startup မွ Restart Now ကိုႏွိပ္ပါ။ နည္းလမ္း (၂) အတိုင္းေပၚလာမည္။


4. Windows 10 installation drive ႏွင့္Command Prompt ကိုအသံုးျပဳျခင္း
ဒီနည္းလမ္းက Normal Windows တက္မလာလွ်င္အသံုးျပဳပါသည္။ Windows 10 DVD အေခြကိုထည့္ၿပီး CMOS တြင္ First Boot ျဖင့္ Boot လုပ္ပါ။Windows Setup မွ Screen ရဲ႕ေအာက္ေခ်ဘယ္ေထာင့္နားမွ “Repair your computer” ကိုႏွိပ္ပါ။

Troubleshoot ကိုႏွိပ္ပါ။ “Advanced options” ကိုႏွိပ္ပါ။ “Command Prompt” ကိုႏွိပ္ပါ။ Command Prompt မွာ bcdedit /set {default} safeboot minimal လို႔ရိုက္ထည့္ပါ။ Enter ႏွိပ္ပါ။ "The operation [was] completed successfully.” ျပလွ်င္ Command Prompt ကိုပိတ္ပါ။ Continue (Exit and continue to window 10) ကိုႏွိပ္ပါ။ Reboot ျဖစ္သြားၿပီး Safe Mode ထဲေရာက္သြားပါမည္။


5. Normal Boot ကိုေႏွာက္ယွက္အသံုးျပဳျခင္း (ဒီနည္းလမ္းက အသံုးမျပဳသင့္ေၾကာင္း အႀကံျပဳပါရေစ။)
Windows 10 ကို boot လုပ္တဲ့အခ်ိန္မွာ ၃ ခါထပ္ေက်ာ္ၿပီး fails ျဖစ္လာလွ်င္ ၄ ႀကိမ္ေျမာက္တြင္ Automatic Repair mode ျဖင့္တက္လာပါမည္။
“Automatic Repair” screen ေပၚလာလွ်င္ “Advanced options” ကိုႏွိပ္ပါ။ Troubleshoot ကိုေရြးၿပီး အေပၚကအဆင့္ေတြအတိုင္းျပဳလုပ္ႏိုင္ပါတယ္။

6. F8 or Shift + F8 (doesn't work when using UEFI BIOS & SSDs)
Window 7 မွာလိုပဲ F8 ဒါမွမဟုတ္ Shift + F8 ျဖင့္၀င္ေရာက္ႏုိင္ပါတယ္၊ ဒါေပမဲ့ UEFI BIOS ႏွင့္ SSDs မ်ားမွာေတာ့အဆင္မေျပပါ။Monday, January 1, 2018
Network ေပၚကေန Shared folder ကိုလွမ္းေခၚတဲ့အခါ Security Policies Block လုပ္ထားတယ္ဆို ေျဖရွင္းနည္း
Saturday, December 30, 2017
Sloved "A required CD/DVD drive device driver is missing" error while window install
1) USB flash drive ျဖင့္ Window Installer လုပ္ရန္ ေအာက္ပါလင့္ကို ၀င္ၾကည့္ၿပီးလုပ္ႏိုင္ပါတယ္။ လုပ္တက္ၿပီးသားသူေတြအတြက္ေတာ့ ၀င္ဖတ္စရာမလုိပါဘူး။
http://itsolutionanddiary.blogspot.com/p/window-7-window-8-usb-drive-install.html
2) ေအာက္မွေပးထားတဲ့ လင့္ကေန ပံုမွျပထားတဲ့ Zip ဖိုင္ႏွစ္ဖိုင္ကို ေဒါင္းလုပ္လုပ္ပါ။
https://downloadcenter.intel.com/download/20868/Intel-Rapid-Storage-Technology-RAID-for-Intel-Desktop-Boards-DX58OG-DP55WB-DX58SO2
3) Window USB Installer ထဲမွာ x86 နဲ႔ x64 ဖိုဒါႏွစ္ခုေဆာက္ပါ။
ေဒါင္းလုပ္ရထားတဲ့ zip ဖိုင္ႏွစ္ဖိုင္ကို သက္ဆိုင္ရာ ဖိုဒါ၊ f6flpy-x86 ကို x86 Folder ထဲထည့္ပါ၊ f6flpy-x64 ကို x64 Folder ထဲထည့္ပါ။
4) CMOS ထဲမွာ First Boot ကို USB Flash Drive ေရြးၿပီး ျပန္တင္ၾကည့္ပါ၊
5) အထက္ပါနည္းေတြနဲ႔မွအဆင္မေျပရင္ ေအာက္ကလင့္ကနည္းအတိုင္းလုပ္ပါ အဆင္ေျပပါတယ္၊ အဆင့္မ်ားသလို႔ အခ်ိန္လဲနဲနဲၾကာပါမယ္။ ေသခ်ာေပါက္ေတာ့ရလိမ့္မယ္ 100% အာမခံတယ္၊
https://tinyapps.org/blog/windows/201608210700_device_driver_is_missing.html


